
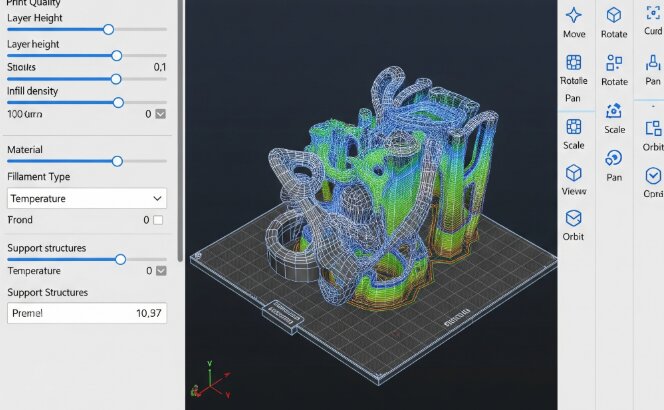
If you’re new to 3D printing, you’ll quickly come across the term slicer. Every successful 3D print starts with a digital model, but a 3D printer can’t understand an STL or 3MF file on its own. Before your printer can begin building an object layer by layer, that model must be translated into instructions the printer understands.
That’s exactly what a slicer does.
Whether you’re printing simple household organizers, cosplay props, replacement parts, or detailed miniatures, learning how a slicer works is one of the most important skills you’ll develop. Understanding the basics will also help you improve print quality, reduce failed prints, and save both time and filament.
In this guide, you’ll learn what a slicer is, how it works, why it’s necessary, and which settings matter most for producing great prints.
What Is a Slicer in 3D Printing?
A 3D printing slicer is software that converts a 3D model into a series of printable layers and generates machine instructions, commonly called G-code, that tell a 3D printer exactly how to build an object.
Think of a slicer as a translator.
A designer creates a model in CAD software or downloads one from an online repository. That model contains only the shape of the object. Your printer, however, needs detailed instructions such as:
- Where to move
- How fast to move
- What temperature to use
- How much filament to extrude
- When to cool the print
- How thick each layer should be
The slicer calculates all of these details automatically based on your chosen settings.
Without a slicer, a standard FDM 3D printer cannot print a model.
Why Is It Called a “Slicer”?
The name comes from the way the software processes a model.
Instead of treating an object as one solid piece, the software slices it into hundreds—or even thousands—of thin horizontal layers.
For example:
- A 100 mm tall model
- Printed at a layer height of 0.20 mm
- Results in approximately 500 individual layers
The printer builds each layer one at a time until the object is complete.
How Does a Slicer Work?
Although modern slicers are highly advanced, the overall process is straightforward.
Step 1: Import a 3D Model
Most slicers accept common file types including:
- STL
- 3MF
- OBJ
These files contain the geometry of your object.
Step 2: Position the Model
The model is placed on a virtual print bed.
You can:
- Move it
- Rotate it
- Scale it
- Duplicate it
- Arrange multiple parts
Proper positioning can reduce supports and improve print quality.
Step 3: Configure Print Settings
This is where the slicer becomes powerful.
You choose settings such as:
- Layer height
- Wall thickness
- Infill percentage
- Print speed
- Nozzle temperature
- Bed temperature
- Cooling
- Supports
- Adhesion methods
These settings directly affect quality, strength, and print time.
Step 4: Slice the Model
Once settings are finalized, the slicer calculates:
- Every movement
- Every layer
- Extrusion amounts
- Travel paths
- Print time estimate
- Filament usage
This process usually takes only a few seconds.
Step 5: Export G-Code
The final output is typically a .gcode file.
This file tells the printer exactly what to do from start to finish.
What Is G-Code?
G-code is the language used by most FDM 3D printers.
A single print may contain tens of thousands—or even hundreds of thousands—of instructions.
Examples include:
- Move to a location
- Heat the nozzle
- Heat the bed
- Retract filament
- Extrude plastic
- Turn cooling fans on or off
- Pause the print
Fortunately, users rarely need to edit G-code manually because the slicer generates it automatically.
Why Is a Slicer So Important?
Many beginners assume the printer is responsible for print quality.
In reality, the slicer plays an equally important role.
The same printer can produce dramatically different results simply by changing slicer settings.
A properly configured slicer can improve:
- Surface finish
- Strength
- Dimensional accuracy
- Bridging
- Overhang performance
- Material usage
- Print speed
Learning how your slicer works often leads to larger improvements than upgrading printer hardware.
Common Settings You’ll Find in a Slicer
Layer Height
Layer height determines how thick each printed layer is.
Typical values include:
- 0.08 mm (very high detail)
- 0.12 mm
- 0.20 mm (general purpose)
- 0.28 mm
- 0.32 mm (fast printing)
Smaller layers:
- Better detail
- Smoother surfaces
- Longer print times
Larger layers:
- Faster printing
- More visible layer lines
Infill
Infill determines how much material fills the inside of an object.
Common values include:
- 10%
- 15%
- 20%
- 40%
- 100%
Most everyday prints perform well between 15% and 25% infill.
Print Speed
Print speed controls how quickly the printer moves.
Higher speeds reduce print time but may decrease quality.
Lower speeds often improve:
- Detail
- Layer adhesion
- Surface finish
Nozzle Temperature
Different materials require different temperatures.
Examples:
PLA:
- 190–220°C
PETG:
- 220–250°C
ABS:
- 230–260°C
The slicer stores these values within material profiles.
Bed Temperature
Heating the build plate improves first-layer adhesion.
Typical examples include:
PLA:
- 50–60°C
PETG:
- 70–85°C
ABS:
- 90–110°C
Supports
Supports help print sections that would otherwise hang in midair.
The slicer automatically generates temporary structures beneath overhangs.
After printing, these supports are removed.
Adhesion
To reduce lifting and warping, slicers can add:
- Brims
- Rafts
- Skirts
Each serves a different purpose depending on the model and material.
What File Types Do Slicers Use?
Most slicers support:
| File Type | Purpose |
|---|---|
| STL | Most common printable model |
| 3MF | Stores models plus print settings |
| OBJ | Geometry with color and texture support |
| GCODE | Final printer instructions |
Many users now prefer 3MF because it preserves additional project information.
Can One Slicer Work With Multiple Printers?
Yes.
Most modern slicers support many different printer brands.
You simply choose the correct printer profile or create a custom one.
Popular printer manufacturers often provide official profiles to simplify setup.
Most Popular 3D Printing Slicers
Several excellent slicers are available today.
Cura
One of the most beginner-friendly options.
Pros:
- Free
- Large community
- Easy interface
- Extensive printer support
Ideal for beginners and hobbyists.
OrcaSlicer
One of the fastest-growing slicers.
Features include:
- Advanced calibration tools
- Pressure advance support
- Intelligent print optimization
- Excellent modern interface
Popular among enthusiasts seeking greater control.
PrusaSlicer
Known for reliability and excellent defaults.
Benefits include:
- Frequent updates
- Strong support generation
- Detailed customization
- Excellent print quality
Works well even with non-Prusa printers.
Bambu Studio
Designed primarily for Bambu Lab printers but compatible with other machines in many cases.
Offers:
- Multi-color printing support
- Fast slicing
- Intelligent calibration
- Optimized workflows
Simplify3D
A commercial slicer offering advanced controls and customization.
Although less common than it once was, some experienced users still prefer it for specialized workflows.
Which Slicer Is Best for Beginners?
For most new users:
- Cura offers the easiest learning curve.
- PrusaSlicer provides excellent default settings.
- OrcaSlicer is ideal once you’re ready for more advanced tuning.
Any of these options can produce excellent prints when configured properly.
Does the Choice of Slicer Affect Print Quality?
Yes.
Different slicers use different algorithms for:
- Travel paths
- Support generation
- Seam placement
- Wall ordering
- Infill patterns
- Acceleration management
Even using identical printer settings, one slicer may produce cleaner prints or shorter print times than another.
Many experienced users eventually test multiple slicers to find one that best matches their printer and preferred materials.
Can You Change Slicer Settings for Every Print?
Absolutely.
Most users adjust settings depending on the project.
For example:
A decorative model might use:
- 0.12 mm layers
- Slow speed
- High-quality walls
A storage organizer might use:
- 0.28 mm layers
- 20% infill
- Faster speeds
A functional bracket may benefit from:
- Higher wall counts
- Greater infill
- Slower outer walls
Modern slicers also let you save custom profiles, making it easy to reuse successful settings.
Tips for Getting Better Results With a Slicer
If you’re just getting started, these habits can significantly improve print quality:
- Begin with the slicer’s default profile for your printer.
- Change only one setting at a time so you can see its effect.
- Preview the sliced layers before printing to catch potential issues.
- Keep your slicer updated, as new releases often improve print quality and add printer profiles.
- Save successful profiles for different filaments and nozzle sizes.
- Learn what each setting controls before making major adjustments.
Small, deliberate changes are often more effective than altering many settings at once.
Frequently Asked Questions
Can a 3D printer print without a slicer?
For nearly all consumer FDM printers, no. A slicer is required to generate the G-code instructions the printer needs.
Is a slicer free?
Many of the most popular slicers, including Cura, PrusaSlicer, OrcaSlicer, and Bambu Studio, are free to download and use.
Does the slicer determine print time?
Yes. The slicer estimates print time based on your settings, including speed, layer height, infill, supports, and travel movements. Actual print time may vary slightly depending on the printer.
Can I use different slicers with the same printer?
Yes. As long as the slicer supports your printer or can be configured with the correct profile, you can use whichever slicer best suits your needs.
What is the easiest slicer to learn?
Cura is often recommended for beginners because of its straightforward interface and extensive documentation, while PrusaSlicer also offers an excellent balance of simplicity and advanced features.
Final Thoughts
A slicer is one of the most important pieces of software in the entire 3D printing workflow. It transforms a digital model into detailed instructions that your printer can follow, controlling everything from layer height and temperatures to print speed and support placement.
Although modern slicers make the process remarkably accessible, spending time learning the meaning behind each setting can dramatically improve print quality and reduce failed prints. Whether you’re creating functional tools, artistic models, prototypes, or replacement parts, understanding how a slicer works is a foundational skill that will benefit every project.
Instead of viewing a slicer as just another piece of software, think of it as the control center for your printer. The more familiar you become with its capabilities, the more consistently you’ll produce high-quality prints.