
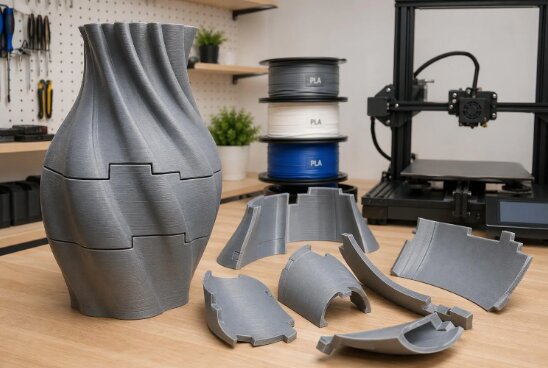
Printing large objects is one of the most rewarding capabilities of a 3D printer. Whether you’re making cosplay armor, functional prototypes, furniture components, architectural models, or oversized decorative pieces, larger prints unlock possibilities that smaller prints simply can’t match.
However, large-scale printing also introduces new challenges. Prints that take 20, 40, or even 100 hours are far less forgiving than small projects. Warping, layer shifts, nozzle clogs, bed adhesion failures, and filament runouts become much more costly when they happen halfway through a print.
The good news is that most failures are preventable with proper planning. This guide covers everything you need to know about how to 3D print large objects successfully, from choosing the right printer to optimizing settings and avoiding common mistakes.
Why Large 3D Prints Are More Difficult
As print size increases, so does the opportunity for something to go wrong.
Large prints require:
- Longer printing times
- Greater dimensional accuracy
- Stronger bed adhesion
- More consistent extrusion
- Better temperature control
- Increased filament consumption
A small calibration cube may finish in 20 minutes, while a large cosplay helmet might require 30–50 hours. A large planter or storage container could exceed 80 hours depending on layer height and infill.
Because the print runs for so long, even minor issues can ruin the entire project.
Choose a Printer With Enough Build Volume
The easiest way to print large objects is with a printer that has an appropriately sized build area.
Typical build volumes include:
| Printer Size | Approximate Build Volume |
|---|---|
| Small | 180 × 180 × 180 mm |
| Standard | 220 × 220 × 250 mm |
| Large | 300 × 300 × 400 mm |
| Extra Large | 400 mm and above |
A larger printer reduces the need to split models into multiple pieces.
However, larger machines also require:
- Better frame rigidity
- Stronger bed heating
- More accurate calibration
- Longer warm-up times
If you frequently print helmets, armor, props, furniture parts, or engineering prototypes, investing in a large-format printer can save considerable time.
Split Large Models When Necessary
Sometimes your model simply won’t fit on your printer.
Instead of scaling it down, divide the model into smaller printable sections.
Many designers intentionally split models because doing so offers several advantages:
- Easier printing
- Reduced failure risk
- Better orientation options
- Faster reprints if one section fails
- Less support material
Most slicing software allows cutting models, while CAD software provides even greater control over seam placement.
Common joining methods include:
- Super glue
- Epoxy
- Plastic welding
- Alignment pins
- Dowel rods
- Screws
- Magnets
This approach is especially popular for cosplay helmets, statues, and movie props.
Optimize Model Orientation
Orientation can dramatically affect both print quality and strength.
Ask yourself:
- Which surface needs the highest quality?
- Which direction experiences the most stress?
- Where will supports be easiest to remove?
- Which orientation minimizes print height?
Reducing print height often saves several hours.
Sometimes rotating a model by just 20 degrees significantly reduces supports while improving overall strength.
Always preview the sliced model before printing.
Improve Bed Adhesion
Bed adhesion becomes increasingly important as print size grows.
Larger prints have more opportunity for corners to lift.
Effective adhesion methods include:
Clean the Print Surface
Dust, grease, and fingerprints reduce adhesion.
Clean the build plate using:
- Isopropyl alcohol
- Warm water with mild soap (if compatible)
- Manufacturer-recommended cleaners
Level the Bed Carefully
Even slight inconsistencies become obvious during large prints.
Check:
- Nozzle distance
- Mesh bed leveling
- Z-offset
- First-layer consistency
The first layer should appear slightly squished without being overly flattened.
Use Adhesion Helpers
Depending on your material, consider:
- Brims
- Rafts
- Mouse ears
- Glue stick
- PEI sheets
- Textured build plates
Brims are especially effective for large flat models.
Choose the Right Filament
Material selection greatly affects success.
PLA
Advantages:
- Minimal warping
- Beginner-friendly
- Easy to print
- Excellent dimensional accuracy
Ideal for:
- Decorations
- Prototypes
- Models
- Indoor projects
PETG
Advantages:
- Stronger than PLA
- Better heat resistance
- Improved durability
Requires:
- More careful tuning
- Slightly slower speeds
ABS
Advantages:
- Strong
- Heat resistant
- Durable
Challenges:
- High warping
- Requires enclosure
- Sensitive to drafts
Large ABS prints often fail without temperature control.
ASA
Similar to ABS but offers:
- UV resistance
- Weather resistance
- Outdoor durability
Excellent for outdoor applications.
Reduce Warping
Warping is one of the biggest enemies of large prints.
It occurs when plastic cools unevenly.
Ways to reduce warping include:
- Increase bed temperature
- Use an enclosure
- Avoid room drafts
- Print with larger brims
- Maintain consistent room temperature
- Reduce cooling for certain materials
- Choose lower-warping filaments
Even an air conditioner blowing across the printer can cause problems during long prints.
Use Appropriate Layer Heights
Layer height affects:
- Surface finish
- Printing time
- Detail
- Strength
Typical recommendations:
- 0.12 mm for detailed models
- 0.20 mm for general printing
- 0.28 mm for large functional prints
- 0.32 mm or higher with larger nozzles
Larger layer heights dramatically reduce print duration.
Consider a Larger Nozzle
Many printers ship with a 0.4 mm nozzle.
Large objects often benefit from:
- 0.6 mm nozzle
- 0.8 mm nozzle
Benefits include:
- Faster printing
- Stronger walls
- Shorter print times
- Better layer bonding
The trade-off is reduced fine detail.
For large structural parts, this trade-off is often worthwhile.
Increase Wall Thickness Instead of Infill
Many beginners increase infill to make prints stronger.
In reality, additional walls often contribute more strength than dense infill.
For example:
Instead of:
- 20% infill
- 2 walls
Consider:
- 10–15% infill
- 4–6 walls
This saves material while improving durability.
Use Smart Infill Patterns
Different infill patterns serve different purposes.
Popular options include:
Gyroid
Excellent balance of:
- Strength
- Material efficiency
- Print speed
Cubic
Provides consistent strength in multiple directions.
Grid
Simple and fast.
Suitable for decorative models.
Lightning
Uses very little material.
Ideal for display pieces.
Monitor Long Prints
Large prints should not be ignored for days.
While modern printers are reliable, occasional monitoring helps catch issues early.
Useful upgrades include:
- Webcam monitoring
- Remote control software
- Power-loss recovery
- Filament runout sensor
These features can prevent wasted material.
Prevent Layer Shifts
Layer shifts usually result from mechanical issues.
Check:
- Belt tension
- Loose pulleys
- Motor overheating
- Cable snags
- Frame rigidity
Large printers experience greater movement, making maintenance even more important.
Ensure You Have Enough Filament
Running out of filament during a 40-hour print is frustrating.
Before printing:
- Estimate filament usage in the slicer
- Weigh partially used spools
- Keep an extra spool available
- Use filament runout detection if possible
Many slicing programs provide both weight and length estimates.
Slow Down When Necessary
Printing faster isn’t always better.
Large prints benefit from stability.
Reducing speed often improves:
- Layer adhesion
- Surface finish
- Dimensional accuracy
- Reliability
For tall prints especially, slower movements reduce vibration.
Keep the Printer Well Maintained
A printer running continuously for several days should be in excellent condition.
Before starting a large print:
- Tighten belts
- Clean rails
- Lubricate moving parts
- Inspect wiring
- Check nozzle wear
- Verify fan operation
Preventative maintenance is far easier than recovering from a failed print.
Reduce Support Material
Support structures increase:
- Print time
- Material usage
- Cleanup
Ways to minimize supports:
- Rotate the model
- Split the model
- Use support blockers
- Adjust overhang angles
- Use tree supports when appropriate
Less support generally produces cleaner results.
Consider Environmental Conditions
Room conditions matter more than many beginners realize.
Ideal conditions include:
- Stable temperature
- Low humidity
- Minimal drafts
- Solid printer table
- Consistent airflow
Avoid placing the printer near:
- Windows
- Fans
- Air conditioning vents
- Exterior doors
These conditions can introduce temperature fluctuations during long prints.
Common Problems When Printing Large Objects
Corners Lifting
Possible causes:
- Poor adhesion
- Bed too cool
- Drafts
Solutions:
- Increase brim
- Raise bed temperature
- Use enclosure
Layer Separation
Possible causes:
- Printing too cold
- Excessive cooling
- Fast print speed
Solutions:
- Increase nozzle temperature
- Reduce fan speed
- Slow printing
Stringing
Possible causes:
- Incorrect retraction
- High temperature
Solutions:
- Tune retraction
- Lower nozzle temperature slightly
Layer Shift
Possible causes:
- Loose belts
- Mechanical obstruction
- Skipped motor steps
Solutions:
- Tighten belts
- Inspect movement
- Reduce acceleration
Print Detaching Midway
Possible causes:
- Weak first layer
- Dirty build plate
Solutions:
- Clean bed
- Re-level printer
- Increase first-layer squish
Is It Better to Print One Large Piece or Multiple Smaller Pieces?
There isn’t a universal answer.
Print in one piece when:
- Strength is critical
- Seams are undesirable
- Your printer has sufficient build volume
Split into multiple parts when:
- Print time exceeds practical limits
- Failure risk is high
- Surface quality matters
- Easier orientation improves results
Many experienced makers intentionally split even printable models because reprinting one failed section is much less frustrating than restarting an entire project.
Frequently Asked Questions
How long do large 3D prints take?
Depending on size, quality settings, and nozzle diameter, large prints commonly take anywhere from 12 hours to well over 100 hours.
Should I use 100% infill for large objects?
Usually not. Most functional prints achieve excellent strength with 10–30% infill combined with thicker walls.
Can beginners print large objects?
Yes. Starting with PLA, properly calibrating the printer, and using conservative settings greatly increases the chance of success.
Is a larger nozzle better for big prints?
Often, yes. A 0.6 mm or 0.8 mm nozzle can significantly reduce print times while maintaining excellent strength for larger models.
What filament works best for large prints?
PLA is generally the easiest choice because it warps less than ABS. PETG offers greater durability with moderate printing difficulty, while ABS and ASA are better suited for applications requiring higher heat resistance or outdoor use.
Final Thoughts
Learning how to 3D print large objects is less about one specific setting and more about preparing your printer for long, reliable print jobs. Success comes from combining proper bed adhesion, thoughtful model orientation, suitable materials, well-maintained hardware, and realistic print settings.
Rather than chasing maximum speed, prioritize consistency. A slightly slower print that completes successfully is far more efficient than a failed print after dozens of hours. With careful planning and a few proven techniques, even very large models can be printed with excellent strength, clean surfaces, and minimal post-processing.