A properly leveled print bed is one of the most important factors in successful 3D printing. Even the most advanced printer can produce poor results if the nozzle is too close to or too far from the build surface.
Many common printing problems, including poor adhesion, warped prints, uneven layers, and failed prints can often be traced back to an improperly leveled bed.
In this guide, I’ll explain exactly how to level a 3D printer bed, why it matters, how often it should be done, and how to troubleshoot common leveling issues.
What Does Bed Leveling Mean?
Despite the name, bed leveling doesn’t necessarily mean making the print bed perfectly level with the ground.
Instead, bed leveling means ensuring that the distance between the printer nozzle and the print surface remains consistent across the entire bed.
When the nozzle maintains the same gap everywhere, the printer can lay down a uniform first layer. This first layer serves as the foundation for the entire print.
If the gap varies from one area to another, problems can occur almost immediately.
Why Bed Leveling Is Important
A properly leveled bed provides several benefits:
- Better first-layer adhesion
- Reduced print failures
- More consistent print quality
- Less filament waste
- Improved dimensional accuracy
- Fewer warping issues
- Smoother bottom layers
Many experienced users consider the first layer the most important layer of any print. If it fails, the rest of the print often fails as well.
Signs Your 3D Printer Bed Needs Leveling
You may need to re-level your bed if you notice any of the following:
Nozzle Too Close to the Bed
Symptoms include:
- Filament barely extrudes
- Scraping noises during printing
- Thin or transparent first layers
- Damaged build surface
- Clogged nozzle
Nozzle Too Far from the Bed
Symptoms include:
- Filament doesn’t stick
- Stringy first layer
- Lines separate easily
- Corners lift during printing
- Print detaches early
Uneven Bed Leveling
Symptoms include:
- One side prints perfectly while another side fails
- Inconsistent first-layer thickness
- Adhesion only in certain areas
- Uneven extrusion patterns
Tools Needed to Level a 3D Printer Bed
Fortunately, you don’t need many tools.
Most users only need:
- A sheet of standard printer paper
- Clean build plate
- Printer controls
- Optional feeler gauge set
- Optional bed-leveling test file
The paper method remains one of the most popular and effective leveling techniques.
How to Level a 3D Printer Bed Manually
Follow these steps carefully.
Step 1: Clean the Print Bed
Before leveling, clean the build surface.
Dust, fingerprints, glue residue, and filament fragments can affect measurements.
Use:
- Isopropyl alcohol
- Microfiber cloth
- Manufacturer-approved cleaners
Avoid touching the bed afterward.
Step 2: Preheat the Printer
Heat affects metal expansion.
Leveling a cold printer and printing hot can introduce inconsistencies.
Set the printer to your typical printing temperatures.
For PLA:
- Nozzle: 190°C–220°C
- Bed: 50°C–60°C
Allow everything to stabilize for several minutes.
Step 3: Home All Axes
Use the printer menu to home:
- X-axis
- Y-axis
- Z-axis
This establishes the printer’s reference position.
Step 4: Disable Stepper Motors
Most printers include a “Disable Steppers” or “Unlock Motors” option.
This allows you to move the print head manually.
Step 5: Move the Nozzle to the First Corner
Position the nozzle above one leveling screw.
Typically start with:
- Front-left corner
Place a sheet of paper between the nozzle and the bed.
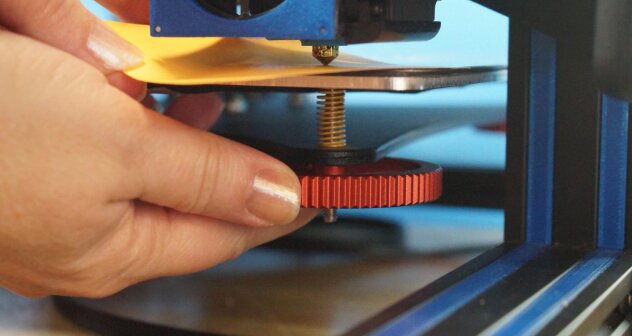
Step 6: Adjust the Leveling Knob
Turn the bed adjustment knob until the paper experiences slight resistance.
The paper should:
- Move freely
- Not become trapped
- Feel a light drag
A common mistake is making the gap too tight.
Step 7: Repeat for All Corners
Move to:
- Front-right
- Rear-right
- Rear-left
Repeat the adjustment process at each location.
Remember that changing one corner may affect the others.
Step 8: Check the Center
Move the nozzle to the center of the bed.
Test the paper resistance again.
The center should feel similar to the corners.
If the center differs significantly, the bed may be warped.
Step 9: Repeat the Process
Most printers require several passes.
Go around the bed two or three times until all points provide consistent resistance.
Step 10: Run a Bed-Level Test Print
Print a simple first-layer test pattern.
Look for:
- Smooth lines
- Consistent width
- Good adhesion
- No gaps between lines
Fine-tune if necessary.
How Automatic Bed Leveling Works
Many modern printers feature Automatic Bed Leveling (ABL).
Examples include:
- CR Touch
- BLTouch
- Inductive probes
- Strain gauge sensors
These systems measure multiple points across the bed and create a compensation mesh.
The printer then adjusts nozzle height automatically during printing.
Important Note
Automatic bed leveling does not eliminate the need for manual adjustment entirely.
Most ABL systems still require:
- Basic bed tramming
- Proper Z-offset calibration
- Occasional maintenance
Understanding Z-Offset
Many users confuse bed leveling with Z-offset.
They are related but different.
Bed Leveling
Ensures the nozzle distance is consistent across the bed.
Z-Offset
Controls the overall distance between the nozzle and the print surface.
If your first layer looks poor despite successful leveling, the Z-offset may require adjustment.
How to Tell If Your First Layer Is Correct
A perfect first layer typically looks:
- Smooth
- Slightly squished
- Consistent in width
- Well bonded to neighboring lines
Too High
Signs include:
- Round filament strands
- Poor adhesion
- Gaps between lines
Too Low
Signs include:
- Excessive squishing
- Rough surface texture
- Elephant foot effect
- Scraping sounds
Common Bed Leveling Mistakes
Leveling a Cold Bed
Heat expansion changes measurements.
Always level at printing temperature.
Ignoring the Center of the Bed
A warped bed may level correctly at corners while remaining uneven in the center.
Over-Tightening Springs
Compressed springs can reduce adjustment range and cause future issues.
Skipping Test Prints
A successful paper test doesn’t always guarantee a perfect first layer.
Always verify with a real print.
Forgetting to Check Z-Offset
A perfectly leveled bed can still produce poor results if the nozzle height is incorrect.
How Often Should You Level a 3D Printer Bed?
Frequency depends on your printer and usage.
You may need leveling:
- After transporting the printer
- After nozzle replacement
- After bed maintenance
- Following crashes or failed prints
- Every few weeks on some machines
Printers with rigid frames and automatic leveling often require less frequent adjustments.
Troubleshooting Bed Leveling Problems
Bed Won’t Stay Level
Possible causes:
- Loose springs
- Worn adjustment knobs
- Loose frame components
- Vibrations during printing
Center Is Higher Than Corners
Possible causes:
- Warped bed
- Uneven build plate
- Manufacturing tolerances
First Layer Still Fails
Check:
- Bed cleanliness
- Filament quality
- Nozzle condition
- Temperature settings
- Z-offset calibration
Leveling is only one part of successful first-layer adhesion.
Tips for Maintaining Bed Level
To reduce future adjustments:
- Avoid pressing on the bed
- Keep adjustment springs properly tensioned
- Clean the build plate regularly
- Recheck after transportation
- Inspect leveling knobs periodically
- Verify Z-offset after hardware changes
Small maintenance habits can significantly improve print reliability.
Frequently Asked Questions
How close should the nozzle be to the print bed?
The nozzle should lightly grip a sheet of standard printer paper while still allowing it to move.
Can automatic bed leveling replace manual leveling?
No. Automatic systems compensate for small irregularities but still require basic bed tramming and Z-offset adjustment.
Why won’t my filament stick after leveling?
The issue may be caused by dirty build surfaces, incorrect temperatures, poor Z-offset settings, or problematic filament.
Should I level the bed before every print?
Most printers do not require leveling before every print. However, it’s wise to check periodically, especially after moving the machine.
What happens if the bed is not level?
You may experience poor adhesion, failed prints, uneven layers, nozzle scraping, and reduced print quality.
Final Thoughts
Learning how to level a 3D printer bed is one of the most valuable skills for any beginner. A properly leveled bed creates a consistent first layer, improves adhesion, reduces failed prints, and helps unlock the full potential of your printer.
While automatic bed leveling systems simplify the process, understanding manual leveling remains an essential skill. Taking a few minutes to verify bed level before important prints can save hours of frustration and wasted filament later.