A properly calibrated 3D printer can mean the difference between flawless prints and constant frustration. Many common printing issues—including poor bed adhesion, stringing, dimensional inaccuracies, layer shifts, and uneven surfaces—can often be traced back to calibration problems.
The good news is that calibrating a 3D printer is not as complicated as it may seem. Once the core settings are dialed in, most printers can produce consistently high-quality results for months with only minor adjustments.
In this guide, I’ll explain exactly how to calibrate a 3D printer step by step, including bed leveling, extrusion calibration, temperature tuning, flow rate adjustments, and other essential settings that improve print quality and reliability.
Why 3D Printer Calibration Matters
Calibration ensures that your printer’s mechanical components, firmware settings, and slicing parameters work together accurately.
A well-calibrated printer offers several benefits:
- Better first-layer adhesion
- Improved dimensional accuracy
- Smoother surface finishes
- Reduced stringing and blobs
- Fewer failed prints
- More reliable support structures
- Stronger printed parts
Even premium printers benefit from occasional calibration, especially after transportation, maintenance, upgrades, or replacing components.
Signs Your 3D Printer Needs Calibration
Before diving into the calibration process, look for these common symptoms:
Poor Bed Adhesion
If prints frequently detach from the build plate or corners lift during printing, bed leveling or Z-offset calibration may be needed.
Stringing
Thin strands of plastic between printed sections often indicate retraction or temperature settings that need adjustment.
Incorrect Dimensions
Parts that print larger or smaller than intended may require extrusion or flow calibration.
Inconsistent Layers
Visible banding, uneven surfaces, or rough textures can indicate mechanical issues or improper calibration.
Elephant’s Foot
If the bottom layer appears wider than the rest of the model, the nozzle may be positioned too close to the build surface.
Tools You’ll Need
Gathering a few simple tools makes calibration easier:
- Digital calipers
- Printer paper
- Feeler gauges (optional)
- Isopropyl alcohol
- Small screwdriver set
- Hex keys
- Calibration cube model
- Filament suitable for testing
Digital calipers are especially useful because many calibration procedures rely on precise measurements.
Step 1: Check Mechanical Components
Before adjusting software settings, inspect the printer’s hardware.
Tighten Loose Fasteners
Check:
- Frame screws
- Belt tensioners
- Motor mounts
- Bed mounting hardware
Loose components can introduce inaccuracies that software calibration cannot fix.
Inspect Belts
Belts should feel firm but not overly tight.
Belts that are too loose can cause:
- Layer shifting
- Ringing artifacts
- Dimensional inaccuracies
Belts that are too tight may increase wear on motors and bearings.
Verify Smooth Axis Movement
Move the print head and bed manually.
Look for:
- Binding
- Resistance
- Grinding
- Uneven movement
Any mechanical issues should be addressed before proceeding.
Step 2: Level the Print Bed
Bed leveling is one of the most important calibration procedures.
An uneven bed causes first-layer problems that affect the entire print.
Manual Bed Leveling
- Preheat the nozzle and bed.
- Disable steppers.
- Move the nozzle to each corner.
- Place a sheet of paper beneath the nozzle.
- Adjust the bed until slight resistance is felt when moving the paper.
Repeat this process for:
- Front left
- Front right
- Rear left
- Rear right
- Center
Continue until all points feel consistent.
Automatic Bed Leveling
Many modern printers include:
- CR Touch
- BLTouch
- Inductive sensors
- Strain gauge systems
Run the printer’s mesh leveling procedure and save the generated mesh according to your printer’s firmware instructions.
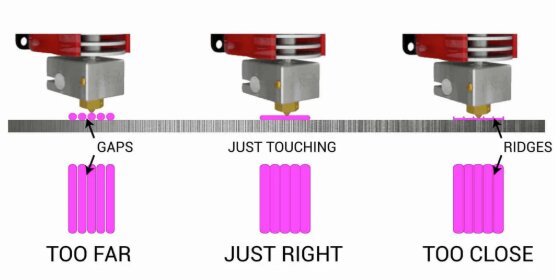
Step 3: Set the Correct Z-Offset
The Z-offset determines the exact distance between the nozzle and build surface.
Even printers with automatic bed leveling require proper Z-offset adjustment.
Signs the Nozzle Is Too High
- Poor adhesion
- Gaps between lines
- Inconsistent first layers
Signs the Nozzle Is Too Low
- Scraping sounds
- Overly squished lines
- Rough bottom surfaces
Print a first-layer test pattern and adjust the offset until extrusion lines are smooth, slightly flattened, and touching each other evenly.
Step 4: Calibrate Extruder E-Steps
Extruder calibration ensures the printer feeds the correct amount of filament.
This is one of the most important calibration procedures for dimensional accuracy.
How to Calibrate E-Steps
- Heat the nozzle.
- Mark the filament 120 mm above the extruder.
- Command the printer to extrude 100 mm.
- Measure the remaining distance.
Example:
- Starting mark: 120 mm
- Remaining filament: 25 mm
- Actual extrusion: 95 mm
Since the printer only extruded 95 mm instead of 100 mm, the E-step value must be adjusted.
Use your printer’s firmware settings or control interface to update the E-step value.
Repeat the process until 100 mm commanded equals 100 mm extruded.
Step 5: Calibrate Flow Rate
Even after E-step calibration, flow settings may need refinement.
Flow calibration compensates for filament variations and nozzle characteristics.
How to Perform Flow Calibration
Print a single-wall calibration cube.
Measure wall thickness using digital calipers.
Compare:
- Expected wall thickness
- Actual wall thickness
Adjust flow percentage until the measurements closely match.
A properly calibrated flow rate improves:
- Surface quality
- Dimensional accuracy
- Layer consistency
Step 6: Calibrate Printing Temperature
Different filaments perform best at different temperatures.
The easiest way to find the optimal setting is by printing a temperature tower.
What Is a Temperature Tower?
A temperature tower prints multiple sections at different temperatures.
This allows you to compare:
- Stringing
- Layer adhesion
- Surface finish
- Bridging performance
Typical PLA range:
- 190°C
- 195°C
- 200°C
- 205°C
- 210°C
- 215°C
- 220°C
Choose the temperature that delivers the best overall quality.
Step 7: Calibrate Retraction Settings
Retraction reduces oozing and stringing during travel moves.
Symptoms of Poor Retraction
- Fine strings
- Blobs
- Surface imperfections
Retraction Test Procedure
Print a dedicated retraction test model.
Adjust:
Retraction Distance
Typical ranges:
- Direct drive: 0.5–2 mm
- Bowden: 3–7 mm
Retraction Speed
Common settings:
- 25–50 mm/s
Continue testing until stringing is minimized.
Step 8: Check Dimensional Accuracy
Dimensional calibration is especially important when printing functional parts.
Print a Calibration Cube
A standard 20 mm cube works well.
Measure:
- X dimension
- Y dimension
- Z dimension
Expected result:
20 mm × 20 mm × 20 mm
Minor variations are normal, but large discrepancies may indicate mechanical issues or extrusion errors.
Step 9: Tune Pressure Advance or Linear Advance
Many modern firmware systems support pressure compensation.
Examples include:
- Klipper Pressure Advance
- Marlin Linear Advance
These features help improve:
- Sharp corners
- Consistent extrusion
- Reduced blobs
While optional for beginners, advanced users often see noticeable print quality improvements after tuning these settings.
Step 10: Verify Cooling Performance
Part cooling plays a major role in print quality.
Inspect:
- Fan operation
- Airflow direction
- Fan speed settings
Poor cooling can cause:
- Sagging overhangs
- Weak bridges
- Soft details
A cooling test model can help determine optimal fan settings.
Recommended Calibration Order
For the best results, perform calibration in this sequence:
- Mechanical inspection
- Bed leveling
- Z-offset adjustment
- E-step calibration
- Flow calibration
- Temperature tuning
- Retraction tuning
- Dimensional testing
- Pressure advance tuning
- Cooling optimization
Following this order prevents one calibration step from affecting another.
How Often Should You Calibrate a 3D Printer?
Most hobbyists do not need to perform a full calibration before every print.
However, recalibration is recommended when:
- Moving the printer
- Replacing a nozzle
- Installing upgrades
- Changing extruders
- Updating firmware
- Switching to a significantly different filament type
Bed leveling and Z-offset checks should be performed more frequently than advanced calibrations.
Common Calibration Mistakes
Changing Multiple Settings at Once
Only adjust one variable at a time.
Otherwise, identifying the source of improvements or problems becomes difficult.
Skipping Mechanical Inspection
Many print quality issues originate from hardware problems rather than software settings.
Using Wet Filament
Moisture can create misleading calibration results.
Always use dry filament during calibration.
Ignoring Temperature Effects
Calibration performed at one temperature may not apply perfectly at another.
Test with the temperatures you actually intend to use.
Frequently Asked Questions
What is the most important 3D printer calibration?
Bed leveling and Z-offset calibration typically have the biggest impact on print success because they determine first-layer quality.
Do automatic bed leveling systems eliminate calibration?
No. Automatic leveling helps compensate for bed inconsistencies, but proper Z-offset adjustment and occasional calibration are still necessary.
Should I calibrate every new filament?
At minimum, temperature and flow testing are recommended when switching to a new filament brand or material.
Can calibration improve print quality significantly?
Yes. Proper calibration can dramatically reduce failed prints, improve dimensional accuracy, and produce cleaner surfaces.
Final Thoughts
Learning how to calibrate a 3D printer is one of the most valuable skills for any maker. While it may seem time-consuming initially, a properly calibrated machine produces better prints, wastes less material, and requires far less troubleshooting.
Start with bed leveling and Z-offset adjustment, then move through extrusion, flow, temperature, and retraction calibration. By following a structured process and changing only one variable at a time, you can achieve professional-quality results from almost any modern 3D printer.